DIY Smart Mirror Raspberry Pi: A Step‑by‑Step Guide to Your Own Magic Mirror
A diy smart mirror raspberry pi turns an ordinary mirror into a futuristic display that shows your morning schedule, weather forecast, and news headlines while you brush your teeth. This diy smart mirror raspberry pi guide covers every step, from choosing the right hardware and installing the free MagicMirror² software to building a clean frame and hanging the mirror securely. If you’ve ever wanted a diy smart mirror raspberry pi that looks like it came straight out of a sci‑fi movie, this is the tutorial for you.
Hardware You’ll Need for a DIY Smart Mirror Raspberry Pi
Before you type a single line of code, gather these components for your diy smart mirror raspberry pi:
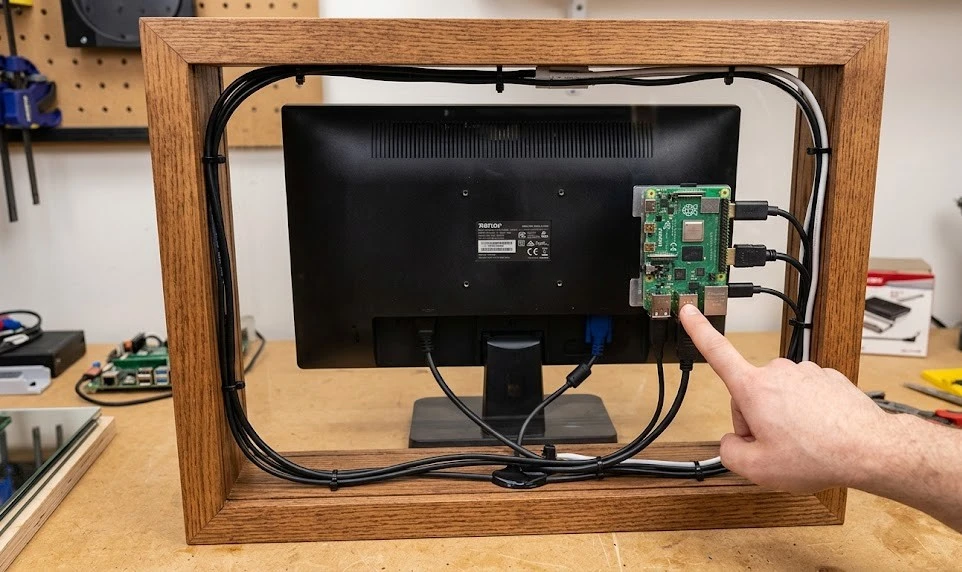
- Raspberry Pi 4 (2GB or higher) or Pi 5 – Handles the display and Wi‑Fi connection. A Pi Zero 2 W works for smaller mirrors but may feel sluggish with multiple modules.
- Monitor – An old computer monitor with HDMI input is perfect. Remove the plastic bezel so the screen can sit flush behind the two‑way glass.
- Two‑way mirror (acrylic or glass) – This special mirror reflects normally but lets light from the screen pass through. Acrylic is cheaper and easier to cut; glass looks more premium. Order it cut to the exact size of your monitor.
- HDMI cable and power supply – Short, right‑angle cables save precious space behind the mirror.
- Frame material – Wood, aluminium channel, or a repurposed picture frame. The frame hides the monitor edges and gives a finished look.
- Optional – A PIR motion sensor that wakes the display when you approach, making your diy smart mirror raspberry pi even more magical.
Installing the MagicMirror² Software
MagicMirror² is the free, open‑source software that brings a diy smart mirror raspberry pi to life. It runs on Raspberry Pi OS and displays a web page that the monitor shows behind the mirror.
- Flash the OS – Use Raspberry Pi Imager to write Raspberry Pi OS (full desktop) to a microSD card. Enable SSH and Wi‑Fi in the advanced settings so you can work wirelessly.
- Boot and update – Insert the SD card, power on, and connect via SSH. Run
sudo apt update && sudo apt upgrade -yto get the latest packages. - Install MagicMirror² – The official installer script does most of the work. Run:
bash -c "$(curl -sL https://raw.githubusercontent.com/MichMich/MagicMirror/master/installers/raspberry.sh)"
- The script will install Node.js, npm, and the MagicMirror application automatically.
- Start the mirror – Navigate to the MagicMirror folder and run
npm start. The display should show the default layout: a clock, calendar, weather, and news feed. - Autostart on boot – Edit the autostart file so your diy smart mirror raspberry pi starts automatically when the Pi powers on:
sudo nano /etc/xdg/autostart/magicmirror.desktop
Customising the Modules for Your Life
The default modules are useful but generic. The true power of a diy smart mirror raspberry pi is customising it to fit your morning routine. Open the config.js file and tweak:
- Calendar Connect to Google Calendar or iCloud. Display multiple calendars (work, personal, family) in different colours.
- Weather Set your location and an API key from OpenWeatherMap. Add a 7‑day forecast.
- News Replace the default RSS feed with one that matters to you.
- Compliments A fun module that displays random compliments. Edit the array with your own messages.
- Community modules Thousands of third‑party modules exist: stock tickers, transit times, fitness stats, and smart home dashboards. Explore the MagicMirror² third‑party module list to expand your diy smart mirror raspberry pi.
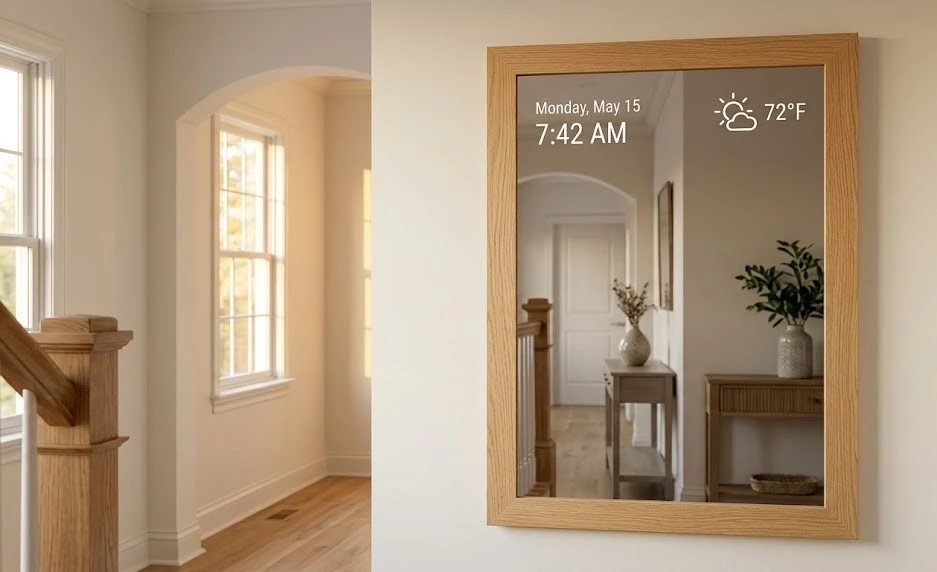
Building the Frame and Hanging the Mirror
The physical build of a diy smart mirror raspberry pi is just as important as the software. A clean frame turns a collection of parts into a piece of furniture.
- Measure precisely – The frame must cover the monitor bezel and the mirror edges. Build it about half an inch larger than the glass on all sides.
- Mount the monitor – Secure the monitor to the back of the frame using VESA mounts or custom brackets. Leave a small air gap between the monitor and the mirror glass for ventilation.
- Attach the mirror – Use mirror clips or adhesive strips. Avoid permanent glue so you can access the monitor later if needed.
- Hang securely – A diy smart mirror raspberry pi is heavier than a normal mirror because of the monitor. Use wall anchors rated for at least 50 pounds, or a French cleat for a flush mount.
When you power it on and step back, your reflection blends with the time, date, and your day’s agenda. A diy smart mirror raspberry pi is a project that genuinely improves every morning.